Faculty - How2 add content, a syllabus, instructor widget, welcome announcement, and activate your course.
All courses at Great Falls College MSU are required to have a presence in our LMS with a minimum of four elements included. This article provides information on the four required elements and instructions for how to complete these requirements on or before the first day of class.
Required Elements
- Instructor Widget
- The Instructor Widget provides students with the instructor's contact information, office hours, a short bio, and a picture.
- Welcome Announcement
- Including an announcement on the course homepage to welcome students is considered a best practice, as the course homepage is the first thing a student will see when they access your course. The welcome announcement will help guide them to what they should look at first and give them some direction for getting started in your course.
- Syllabus in Course Content
- Instructors are required to post their syllabus in their course and the best place to do that is Content. Many instructors create a module called "Getting Started" or something similar that includes the syllabus, course schedule, and other important information.
- Activate the course
- Students will not be able to see your course in Brightspace until you activate it, so this is incredibly important.
Copy or Create Content
Your course needs content and there are a few ways to add content to your course. The two most common are to copy content from another course shell you have instructor-level access to or to create the content within the course shell. Below are the instructions for copying content into your course from another course. For instructions for creating course content from scratch, please view the following article from D2L. https://documentation.brightspace.com/EN/le/content/instructor/content_tool_intro.htm
- Click on "Course Admin" and click on "Import/Export/Copy Components" within the course you are wanting to copy your content into.
- Choose "Copy Components from another Org Unit" and click "search for offering".
- Search for the previous course you want to copy content from and select it.
- Choose "Copy All Components".
- Stay on this screen until ti shows that the process has completed.
Instructor Widget
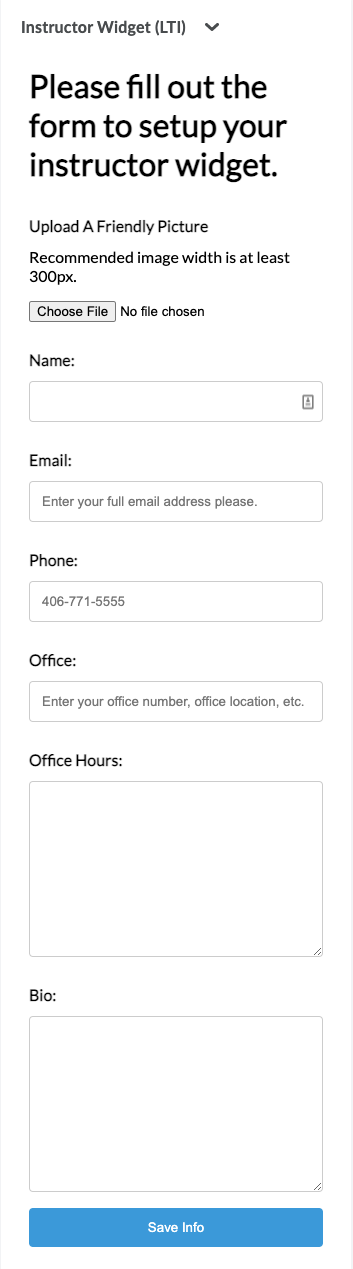
The Instructor Widget lives on the default course homepage that all courses get by default when the course shells are created. It is a simple form that the instructor can fill out to provide students with their contact information and a picture. When you access your course for the first time, you will see a form that looks like the one below. Upload a picture using the "choose file" button. Please make sure your picture has been optimized for web (if the file size is too large you may receive an error when you upload it). Enter information in any fields you wish to be visible. See below for an example of what it will look like.
Once you have filled out the form and clicked on "Save Info", you will need to refresh the page to see the changes. It will look similar to this.
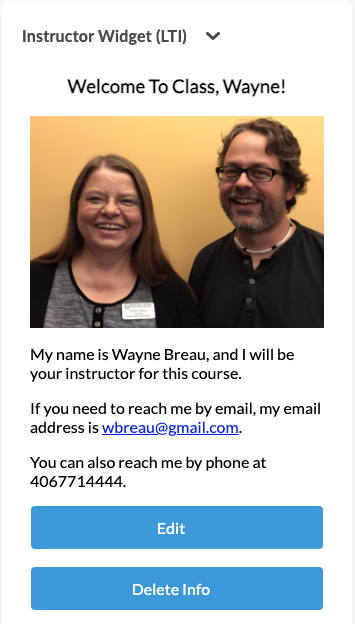
If you need to make changes to any of the text information, click Edit, make changes, and click "Save Info".
If you need to change the picture, or add a picture later, you will need to click on "Delete Info" and fill out the form from scratch, being sure to upload the correct picture.
Students will see the instructor widget similar to what is shown above but they will not see an Edit or Delete button. If you have not completed the instructor widget yet, the students will see a message that lets them know that their instructor hasn't completed it yet.
Welcome Announcement
A welcome announcement helps orient students to your course and gives them some direction for how to get started. To create an announcement:
- Click on the "more actions" arrow to the right of Announcements and click on New Announcement.
- Enter a headline for the announcement.
- Click on the Content area and type your welcome message.
- When you are done, we recommend that you add date restrictions so the welcome message disappears on a specific date and time, but this is not required. Some instructors plan out announcements for each week or for specific events and schedule them to appear and disappear when they should no longer be needed.
- Once you have completed the setup of your announcement, click on the "Publish" button.
Syllabus in Course Content
All courses are required to include the syllabus in the content area of Brightspace. The syllabus is typically in Word or PDF format, and the process to upload is the same regardless of the file type.
- From your course, click on Content.
- Upload/Create > Upload Files.
- Select My Computer.
- Click the Upload button.
- Locate the file on your computer and select it.
- Click the blue Add button.
- You should see the file appear in your course content.
Activate The Course
Students can see your course up to one week prior to the start date of the course or term IF the instructor activates it early. Some instructors even setup their courses during the end of the previous semester and activate them so the students can begin to see the course listed in Brightspace and see any content the instructor has made available to them one week prior to the semester start.
Regardless of whether you want your students to see the course early or not, you will need to activate the course in order for the students to see it and interact with it.
To activate your course:
- From the course, click on Course Admin.
- Click on Course Offering Information.
- Scroll down, locate and check the box next to "Course is Active".
- Click Save.
If you have any questions about the information contained in this article, please contact Becky Sullivan - Instructional Designer, in the Teaching & Learning Center, or Wayne Breau - Instructional Technology Specialist, in the Technology Assistance Center.